
May 14, 2019
Yamaha Jet Boat KeelShield Install Tips
Enjoying a jet boat comes with a lot of advantages. It’s great for the family, shallow water, beaching, river running, and all our favorite boating activities. But sand, rocks, concrete boat ramps, and rough shorelines do no favors even for a well built jet boat. Causing scratches, dings, and costly damage to the fiberglass gelcoat. As well as make a hassle at the boat ramp when there isn’t a dock to use.
We’d like to help show you how you can protect your jet boat, make life easier at the ramp, and ensure you receive a lifetime of worry free protection from your KeelShield.
Will KeelShield fit my jet boat? More than likely it will, as the KeelShield keel guard fits and installs easily on most jet boat brands out there due to it’s tough & flexible nature. As it’s 100% Pure Polyurethane. You’ll find them on Yamaha Jet Boats, Scarab, Chaparral, and many more vintage jet boats as well.
The installation tips below are key points to remember when installing your Keelshield keel guard per our instructions here.
Install Tips:
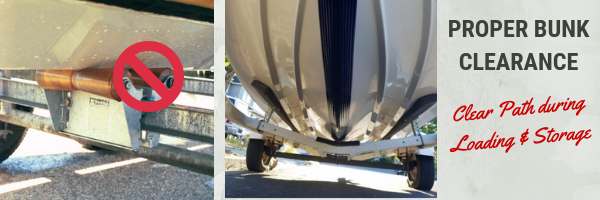
- Trailer Set Up – Ensure your trailer bunks and rollers are set up correctly to ensure a clear path for the shield – and ensure a lifetime of protection out of your KeelShield keel guard. The KeelShield is designed for impact and abrasion, but the pressure sensitive adhesive is not designed to support the weight of the boat on a roller or bunk during storage, or repeated edge impact from trailer bunks during loading and unloading. If your bunks are in the way, adjust them out a bit to provide clearance. If they are permanently in the way – you may need to adjust how you load/unload your boat or forego installation.
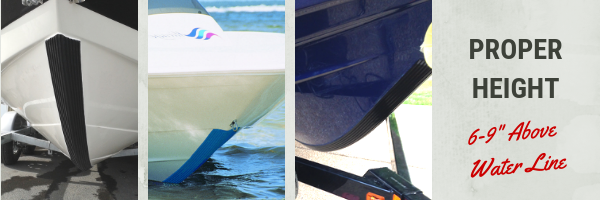
- Proper Height – Ensure your KeelShield is started at the correct height – 6-9″ inches above the resting waterline. This is to ensure that the leading edge is out of the water while you are cruising trimmed down. Mounting it too low can cause the leading edge to eat extreme water pressure constantly while under power, potentially affecting adhesion.
- Heat – Lay the KeelShield out in the direct, warm sun for 30 minutes to make the material as flexible as possible to form around the keel and any ribs or protrusions you may encounter. You can also use a hairdryer to accomplish this.
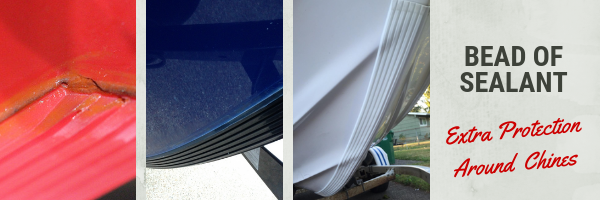
- Sealant – Once installed, use marine grade sealant for below the waterline (3M 4200 or equivalent) around the leading and trailing edge of the KeelShield Keel Guard, especially around any uneven areas near the keel chines or protrusions that is possibly leaving small gaps. The goal here is to completely seal the KeelShield so that no water may work it’s way underneath the adhesive if working around uneven areas.
By installing a KeelShield you provide insurance against the hazards in the water while beaching or running the shallows. As well as making life a whole lot easier at the boat ramp. This is especially critical if you own a jet boat to run in the river, the flats, or even pulling up to party on your local sand bar.
If you ever have any questions about KeelShield’s application for your boat – feel free to reach us at any time at Info@Gator-Guards.com or call us at 888-594-5335